It took me a while till I had everything sorted out to be able to push my packages to vRO/vRA so I documented my process. If I ever need to do it again I can always come back to my own blog 😀 and hopefully it also helps some of you in the process.
At the time of writing the version of Aria Build tools was 4.6 You can always check the latest version of the tools at this link
Content blog article
- Download & install the necessary software for windows
- Configure your workstation
- Create your vro project
- Create your vra project
- Push your code
- Closing off
1. Download & install the necessary software for windows
If you scroll down on the homepage of the Aria build tools, you will find the dependencies for the software you need.
I’m going to do the install on a Windows 11 machine
1.1 Install Apache Maven 3.9.9
You can download Apache Maven 3.9.9 from this link, where you can just download the “Binary zip archive”.
Once downloaded, unzip the file to your local appdata (C:\Users\your-user-profile\AppData\Local) and add the path to your system variable. But we’ll do that at the end so we can add the paths of the other software at the same time.
1.2 Install Node JS 22.14
You can use this link for downloading Node JS.
Select the correct version at the top and click on the “Windows Installer (.msi)”. This will install the prebuilt Node.js
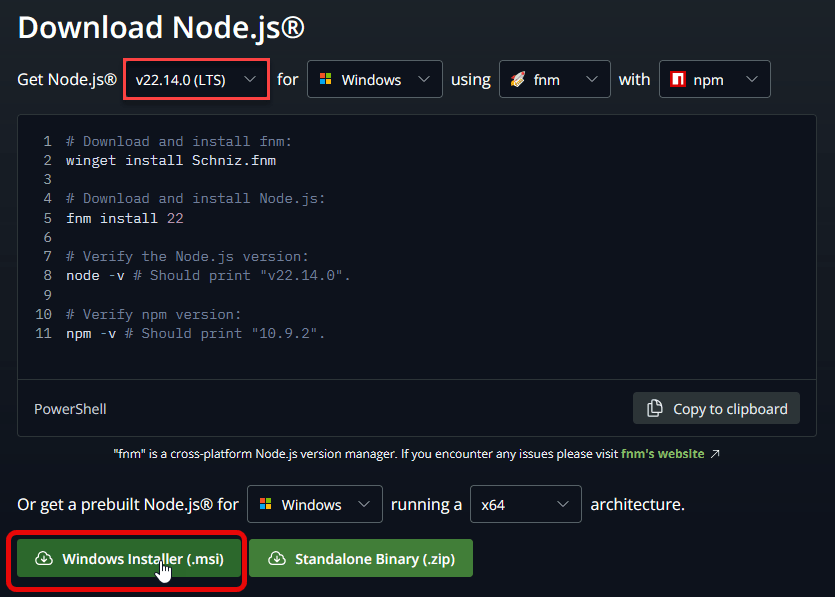
When you install Node.js there is only 1 option you need to check during install and it’s the “Chocolatey” option.

After the install is finished you will get another pop-up to install some additional tools. Just press any key to continue.

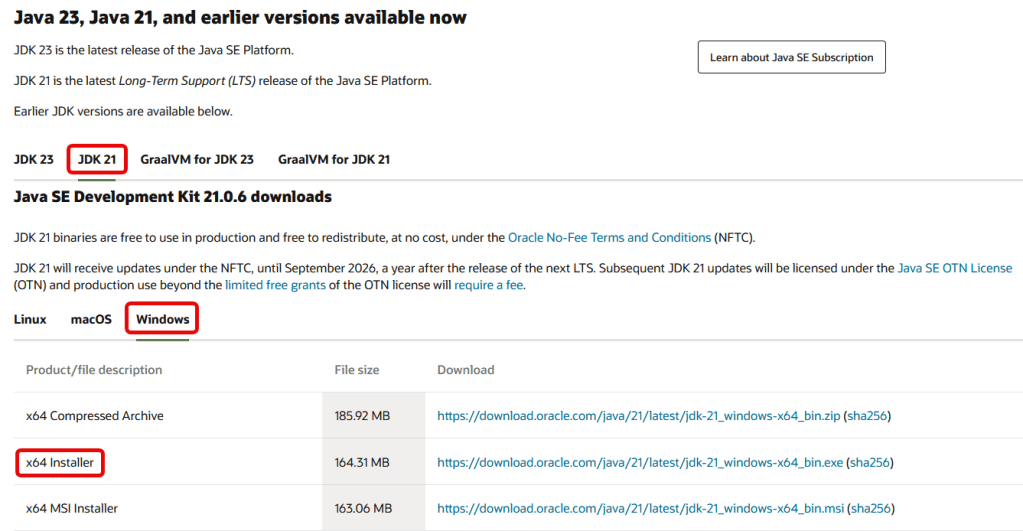
1.3 Install Java jdk 21
From this link you can download Java JDK 21
In the next step we will add the system variable JAVA_HOME
1.4 Update system environment variables
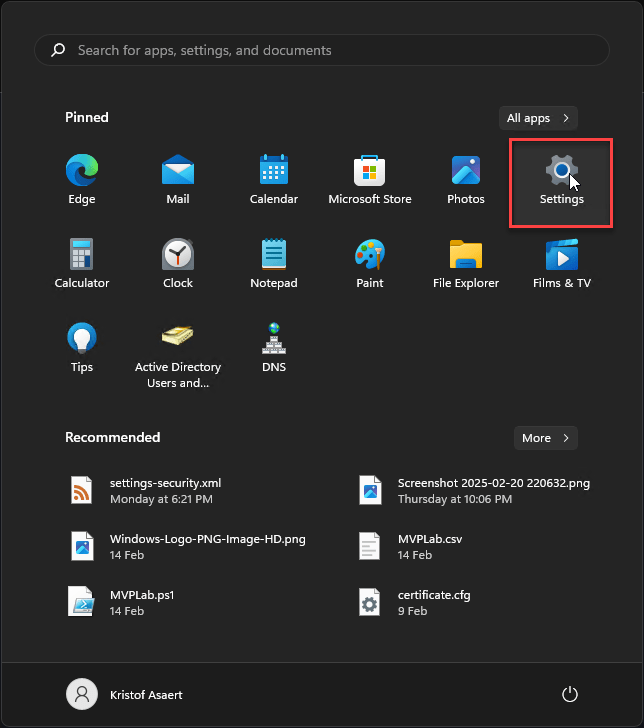
Go to settings
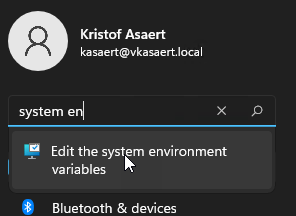
Type in “System en” and click on “Edit the system environment variables”
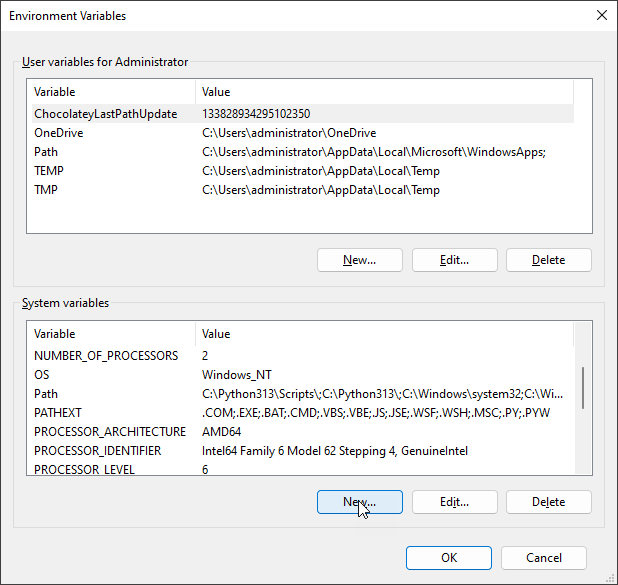
Click on “Environment Variables”

Scroll down in the “System variables” section until you see “Path” and click on “Edit”

Click on “New”
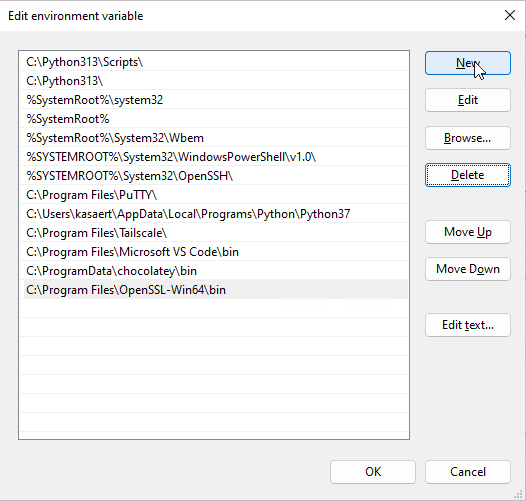
Add these entries to your list:
- C:\Users\your-user-profile\AppData\Local\apache-maven-3.9.9\bin
- C:\Program Files\nodejs

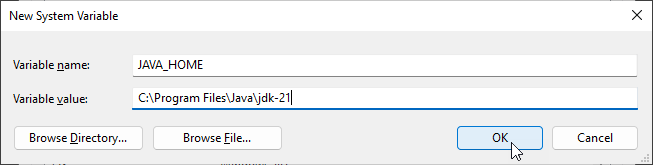
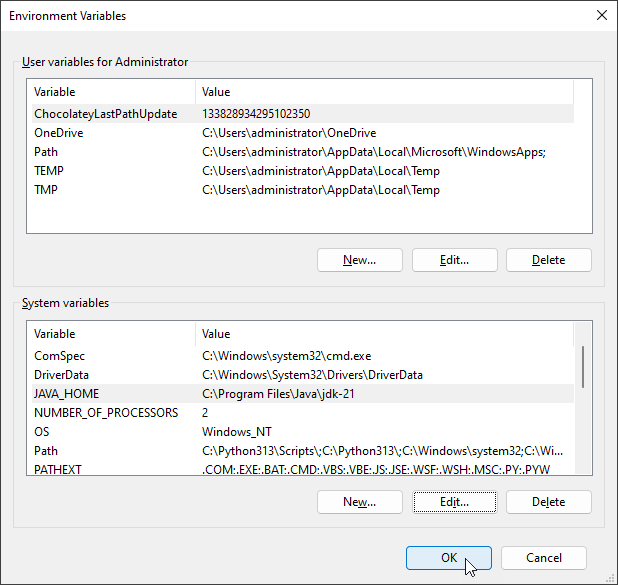
Now we will add an extra “System variable” for JAVA_HOME. Click on “New”
Fill in the path of your Java directory => C:\Program Files\Java\jdk-21 and click on OK
Click on OK when you return to the main window.
Now reboot your computer.
1.5 Install Visual Studio Code + vRealize Developer tools
Visual Studio Code can be downloaded from here
You can choose to select both “Add “Open with Code” action ….
The rest is just next / next / finish.

Once you have installed Visual Studio Code you can click on extensions. The icon on the bottom left with the 4 squares and then just type “vrealize” in the search bar.
You can click on install next to “vRealize Developer Tools”

Once it’s installed you can click on “Setting”
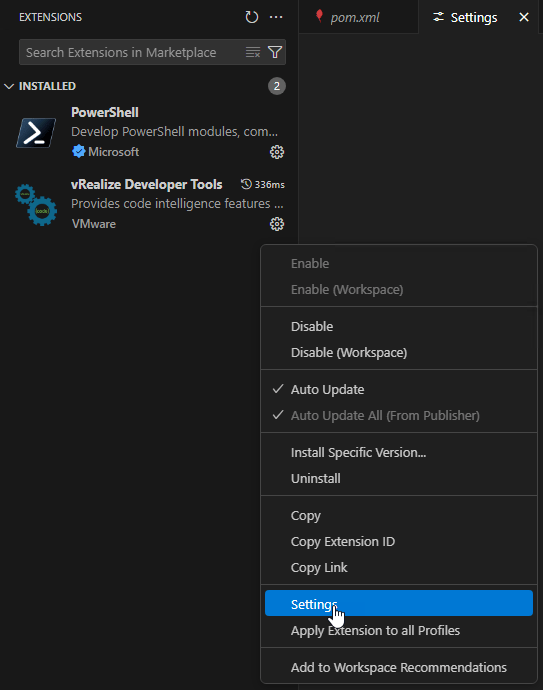
Change the Vrdev > Build Tools: Default Version to 4.2.1
Which is the current version of the vRealize Build Tools.

1.6 Validate your install
Validate your previous installations. Open VSCode (or just a command-prompt) and open a terminal and execute these commands:mvn --version
node --version
npm --version
As you can see in the printscreen below you should get back the version of what you have installed. If not then you probably missed something in your path variable.

2. Configure your workstation
The next step is creating a certificate and some files & folders.
2.1 Create Certificates for signing your vro package
First we’ll create the necessary certificates for signing our vro package. The easiest way to do this is when you create a config file, where you set the requirements for your certificates. If you copy this you will need to change it from line 15 onwards.
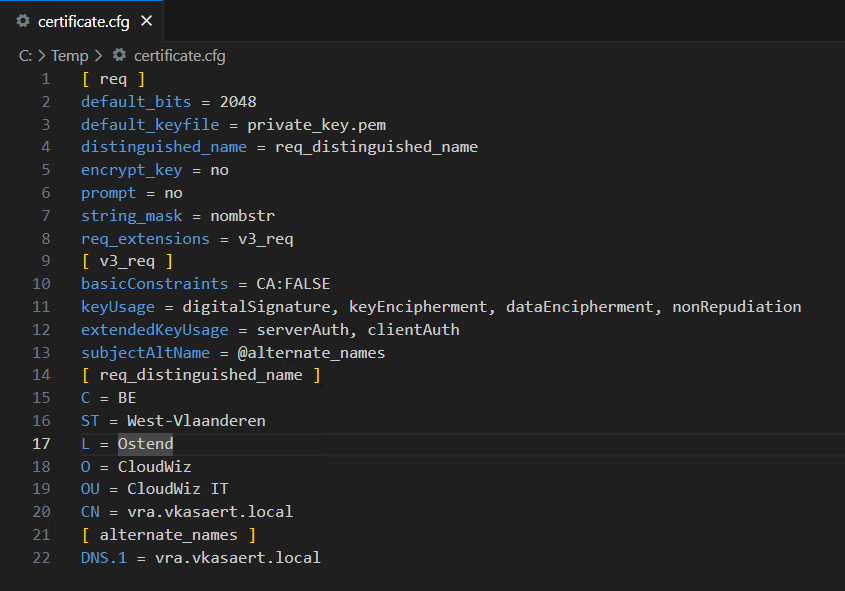
[ req ]
default_bits = 2048
default_keyfile = private_key.pem
distinguished_name = req_distinguished_name
encrypt_key = no
prompt = no
string_mask = nombstr
req_extensions = v3_req
[ v3_req ]
basicConstraints = CA:FALSE
keyUsage = digitalSignature, keyEncipherment, dataEncipherment, nonRepudiation
extendedKeyUsage = serverAuth, clientAuth
subjectAltName = @alternate_names
[ req_distinguished_name ]
C = BE
ST = West-Vlaanderen
L= Ostend
O = CloudWiz
OU = CloudWiz IT
CN = vra.vkasaert.local
[ alternate_names ]
DNS.1 = vra.vkasaert.local
Once you created the config file you will need to execute some commands. First we will create a private key. The password you fill in here will also be filled in the settings.xml file later on.
openssl genrsa -passout pass:YourPassw0rd -out private_key.key 2048
Now we’re going to create a self-signed certificate with the following command.
openssl req -new --x509 -sha256 -days 3650 -key private_key.key -out certificate.crt -config certificate.cfg
Now we will convert previous files to a pfx file.
openssl pkcs12 -export -name "VRA-Certificate" -out certificate.pfx -inkey private_key.key -in certificate.crt
Now we will use the pfx to create the pem files.
openssl pkcs12 -in certificate.pfx -nocerts -out private_key.pem
openssl pkcs12 -in certificate.pfx -nokeys -clcerts -out certificate.pem
The last 2 files (*.pem) will be copied to c:\coding
2.2 Create settings-security.xml
The files and folders we’re going to create in your User Profile directory. Type %userprofile% in your Windows explorer address bar.
Create a “.m2” folder in your User Profile Directory.

In the same folder create a new file called settings-security.xml
In this file we need to put the encrypted Maven master password. And we get that encrypted password by executing: mvn --encrypt-master-password
It will prompt you to enter a password, this can be whatever you want.

Copy the output from the command you just executed and paste it in your xml file and save the file.
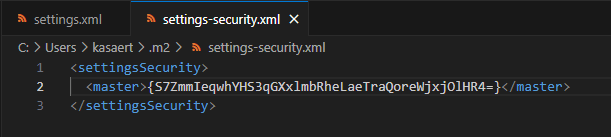
<settingsSecurity>
  <master>{S7ZmmIeqwhYHS3qGXxlmbRheLaeTraQoreWjxjOlHR4=}</master>
</settingsSecurity>
2.3 Create settings.xml
Create another new file settings.xml, in which you copy/paste the code you can find below.
What do you need to change?
- vroPrivateKeyPem
- vroCertificatePem
- vroKeyPass
- vrang.host
- vrang.project.name
- vrang.refresh.token => just get a refresh token with an API call to you vRA environment
- vro.host
- vro.refresh.token
- because I have self-signed certificates I’ve set ignore.certificate to true

<?xml version="1.0" encoding="UTF-8"?>
<settings xmlns="http://maven.apache.org/SETTINGS/1.0.0"
          xmlns:xsi="http://www.w3.org/2001/XMLSchema-instance"
          xsi:schemaLocation="http://maven.apache.org/SETTINGS/1.0.0 http://maven.apache.org/xsd/settings-1.0.0.xsd">
    <profiles>
        <profile>
            <id>packaging</id>
            <properties>
                <vroPrivateKeyPem>C:/Coding/private_key.pem</vroPrivateKeyPem>
                <vroCertificatePem>C:/Coding/certificate.pem</vroCertificatePem>
                <vroKeyPass>VMware1!</vroKeyPass>
            </properties>
        </profile>
        <profile>
            <id>aria</id>
            <properties>
                <!-- Aria Automation Connection -->
                <vrang.host>vra.vkasaert.local</vrang.host>
                <vrang.port>443</vrang.port>
                <vrang.org.name>VIDM</vrang.org.name>
                <vrang.project.name>CloudWiz</vrang.project.name>
                <vrang.refresh.token>cIVm8dG8rJf5w9kamyK1BXKqerOdONJt</vrang.refresh.token>
                <vrang.vro.integration>embedded-VRO</vrang.vro.integration>
                <vrang.bp.release>true</vrang.bp.release>
                <!-- Aria Automation Orchestrator Connection -->
                <vro.host>vra.vkasaert.local</vro.host>
                <vro.port>443</vro.port>
                <vro.auth>vra</vro.auth>
                <!-- <vro.authHost>vra.vkasaert.local</vro.authHost> Required for external AAO instances when AA auth is used -->
                <!-- <vro.authPort>443</vro.authPort> Required for external AAO instances when AA auth is used -->
                <vro.refresh.token>cIVm8dG8rJf5w9kamyK1BXKqerOdONJt</vro.refresh.token>
                <!--<vrealize.ssl.ignore.hostname>true</vrealize.ssl.ignore.hostname> -->
                <vrealize.ssl.ignore.certificate>true</vrealize.ssl.ignore.certificate>
            </properties>
        </profile>
    </profiles>
    <activeProfiles>
        <activeProfile>packaging</activeProfile>
    </activeProfiles>
</settings>
3. Create your vro project
Now we have all the config in place, we can finally create our project. Create a folder on your computer where you want to store your project. In my case it was c:\coding\AriaSuite
We will now create a vro project. Open VSCode and select “Open Folder”

Browse to the folder you just created and click on “Select Folder”

In VsCode click on the search bar and select “Show and Run Commands”

Start typing “vrealize” and you will see all the commands related to the vRealize plugin you installed. Select “New Project”

Select “vRO Typescript-based”

Fill in a groupID

Give your project a name. In this case we’re creating a vro project.

Click on “Create Here”

You will see that your project is being created, in the bottom right

If you want, you can also create this vro project through command-line. Be sure to open a Command-prompt and not a powershell prompt if you’re in VsCode.
Execute this command: mvn archetype:generate -DinteractiveMode=false -DarchetypeGroupId=com.vmware.pscoe.o11n.archetypes -DarchetypeArtifactId=package-typescript-archetype -DarchetypeVersion=4.6 -DgroupId=com.cloudwiz -DartifactId=vro

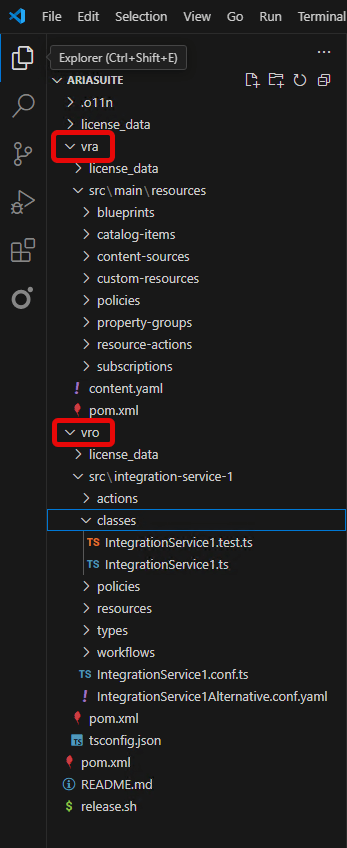
4. Create your vra project
Now the previous command will only create a folder structure for vro related topics. But you can also create a “vra” project that will contain both a section for vro & vra.
Go to the directory c:\coding and execute below command in a command-prompt:
mvn archetype:generate -DinteractiveMode=false -DarchetypeGroupId=com.vmware.pscoe.o11n.archetypes -DarchetypeArtifactId=package-vra-ng-archetype -DarchetypeVersion=4.6 -DgroupId=com.cloudwiz -DartifactId=AriaSuite

If you open VsCode, you will see that you have 2 different sub-folders. One for vra and one for vro. You can organize the subfolders of these 2 directories as you see fit. But they give you a general structure on how you can organize your code.
5. Push your code
Let’s say that you have created your project and you’re ready to push it to your vra environment. Well you can simply do that by executing this command:mvn clean package vrealize:push -DincludeDependencies=true -DskipTests -Paria
You can also choose to only push the vro part of your package. Just make sure you’re in the “vro” folder when you execute this command. If you do that he will only push the vro code.
If we validate the packages in Orchestrator you will now see that your package has been pushed in vro.

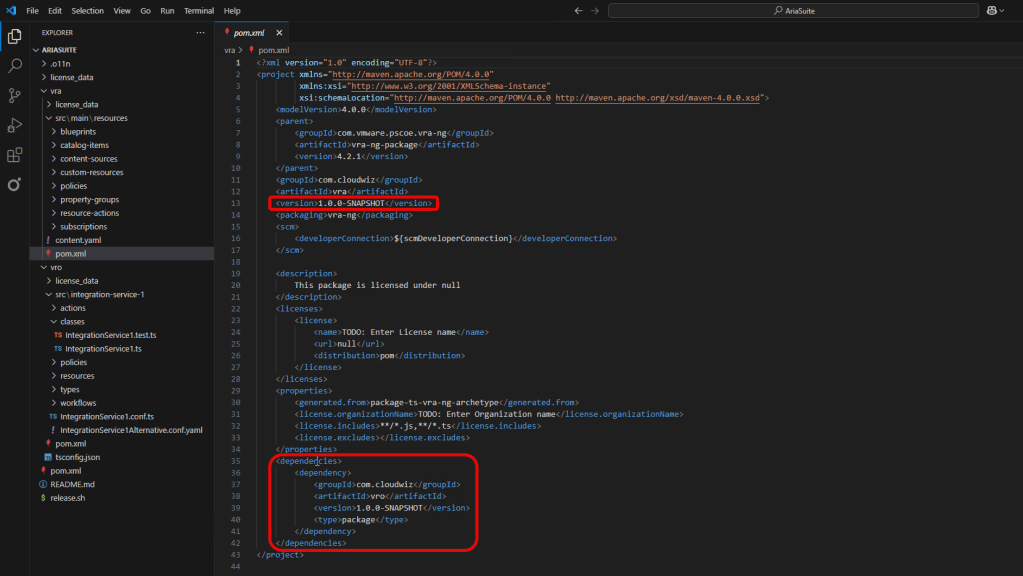
6. Versioning your packages
One important file in your folder structure is the pom.xml file. You will see that you have 3 pom.xml files. One in the root and one in each subfolder.
In the first selection I highlighted, you can manipulate the version of the package you’re pushing. Meaning that once you want to bump you version you can do that with changing it for example to 1.0.1.
What you need to take into account is that if you bump one of the pom files to a higher version you also need to update the dependency to that same version. That’s the second highlighted selection. Otherwise you’ll get an error when pushing your code.
7. Closing off
My homelab has self-signed certificates, which means that the configuration for the aria build tools is tailored to my setup. The goal is that I will change those in the near future so it simulates more a production ready environment.
Also in a production setup you would expand your configuration with gitlab and artifactory. Once I figure out that part I’ll create a new blog with those components in it. So stay tuned for updates.

One thought on “Configure your windows workstation for Aria Build Tools”