Accepting the role as Belgian VMUG leader made me seriously neglect my homelab. So once I’ve found some time again to focus on my homelab, all my licenses and passwords were expired and I had to upgrade from 8.3 to 8.8.
Because I’ve deployed everything with LCM I had to do it step-by-step, and for people that know me, I don’t have a lot of patience. So this upgrade really tested my patience levels 😀 But looking at it from the bright side, I’ve learned to use LCM the right way 🙂
Content blog article
1. General upgrade tips
Everyone working with the vSphere suite, knows that there is an order to upgrade your environment => link. For my homelab, I can cross-out vADP-based backup solutions, VR and SRM because I’m not using these products.
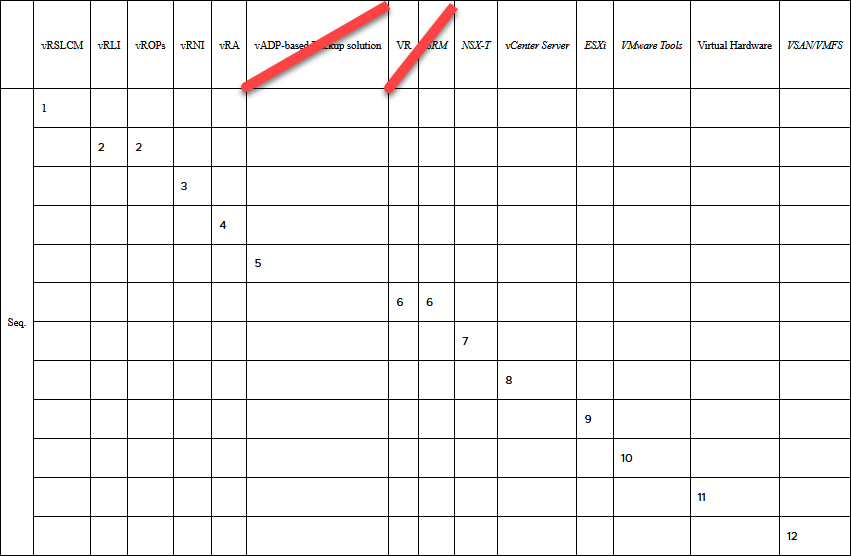
The second step is to check the interoperability matrix for the different products you have in your environment => link
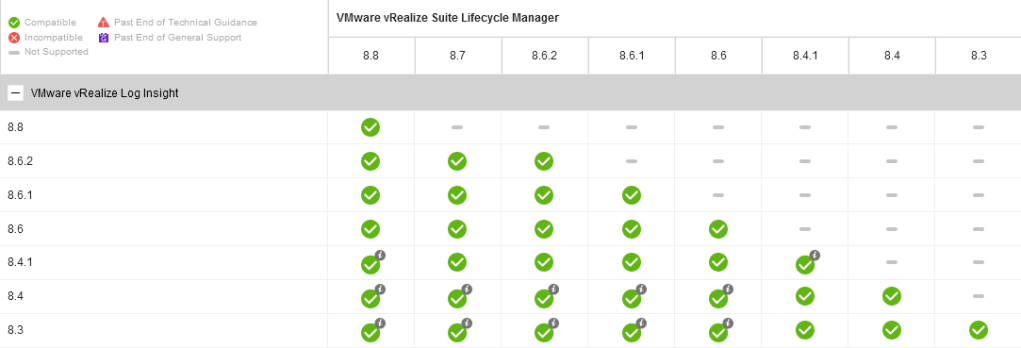
Each version of LCM is limited to a subset of product versions that you can install. So make sure that the version of LCM you’re upgrading to, enables you to install the necessary version of your products. You can best check the release notes of the version of LCM you’re going to install to see the highest supported version of the products you want to deploy with LCM.
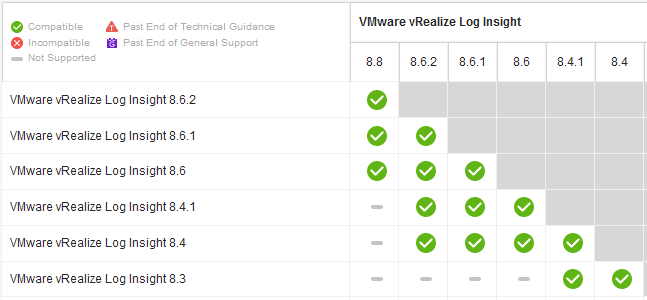
And for the 3rd and last step you also need to check the upgrade path for your products => link
This will let you know how big the steps are that you can take. In below printscreen you see that you can upgrade from vRLI 8.3 to 8.4.1, then from 8.4.1 you can jump to 8.6.2 and then finally you can jump to 8.8.
My first step was to upgrade LCM from 8.3 to 8.4.1. And to make sure that I was able to install the highest version possible for the different products I had to install PATCH 2 and Support Pack 4 on LCM.
2. LCM tips
2.1 Password management
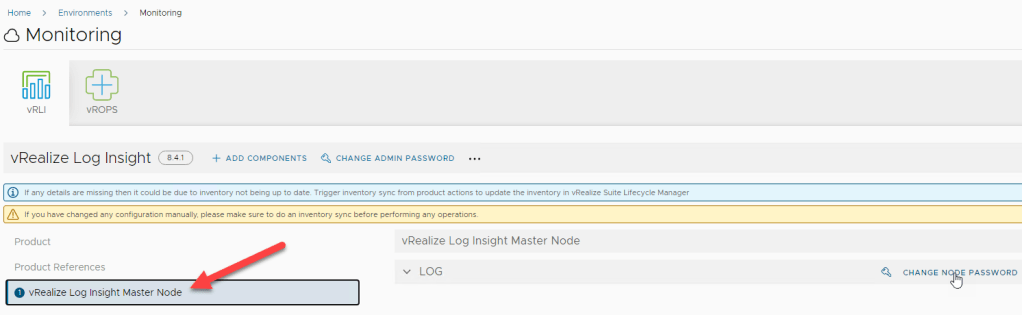
Initially, I didn’t realize that the “change admin password” referred to the account that you use to login to the webclient of the product. So I was trying to update my root password, but that didn’t work because I was checking the wrong account 🙂
In case you need to change the root account of your appliance(s), you first go to your appliance. In my case I only have 1 master node, and then on the left you will see the option to “change node password”. Once you click that you can change the root account of your appliance.
2.2 License management
As a vExpert I have access to yearly licenses for my homelab. So one thing you need to be aware of when doing your upgrades is to make sure that the licenses that are present in LCM during your deployment are also updated.
When you go to one of your deployments and you click on the 3 dots, you have the ability to add licenses to your product.

Here you can see that my license is expired and that will cause issues during your upgrades. So make sure to enter a new one.

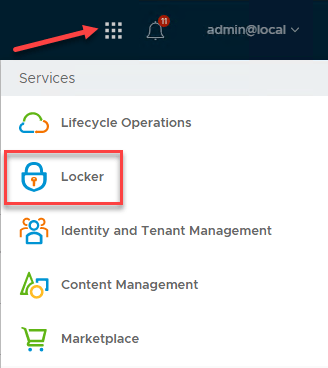
You can add new licenses through your locker. You can find the 9 dots in the upper right corner of your webinterface.
And then you can “Add License Manually” or “Retrieve Licenses” through your “My VMware account”

2.2 Health check
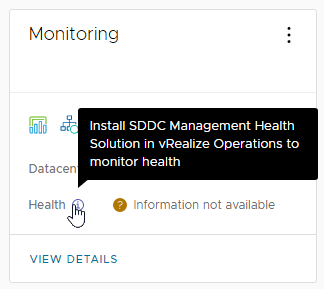
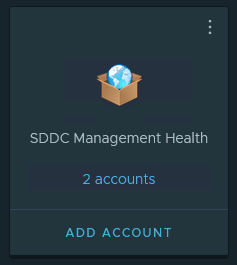
When you check your environments you will see now that there’s a Health monitoring available. But in my case, it’s not yet configured.
Go to VMware’s marketplace and download SDDC Health Monitoring Solution 8.6.1

In case you get a “403 No Access” just like me, go check out this KB to solve it.

Now once the .pak is downloaded connect to vROPS and go to Data Sources => Integrations and then go to Repository.
Click on “Add”.

Browse to where the .pak is downloaded and click on “Upload”
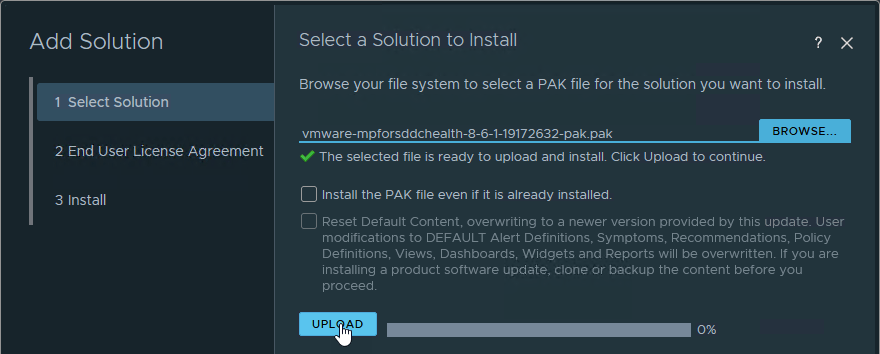
You have to wait a while, but once you see that your PAK file is valid click on “Next”

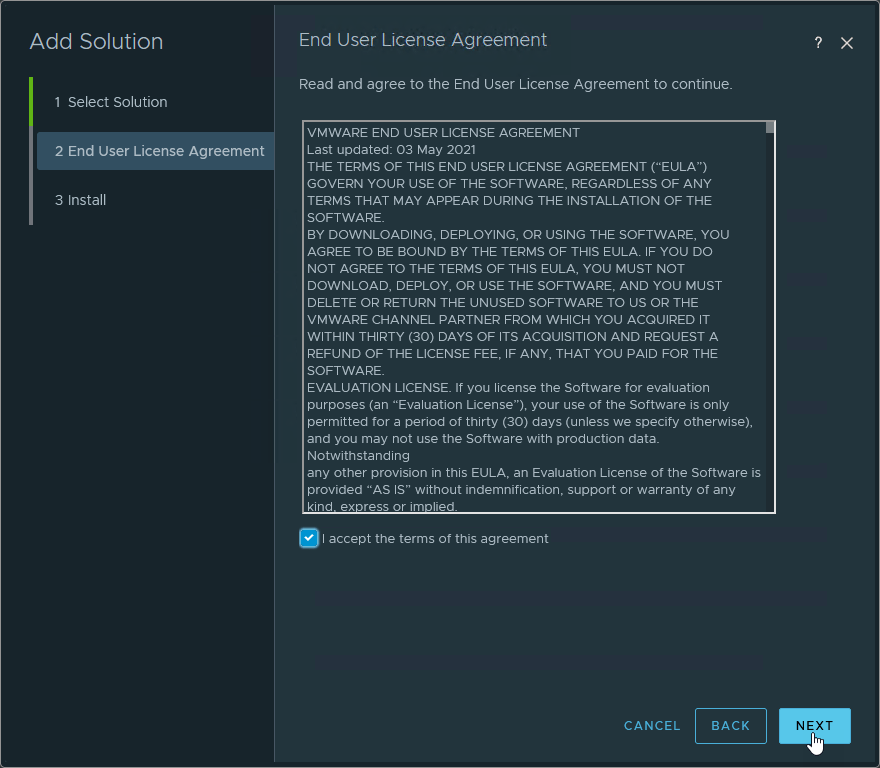
Accept the Terms and click on Next
You’ll see that your .pak file is installing

Once it’s done click on “Finish”

Now you should see it in your installed integrations.
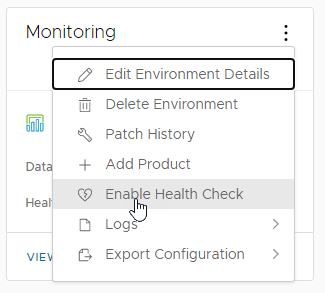
Now if you go back to LCM and you go to your Environments. Click on the 3 dots in the upper right corner of your environment and click on “Enable Health Check”.
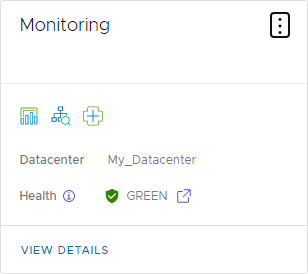
I had to do the previous step twice before I was able to see my Health Status.
3. vRNI tips
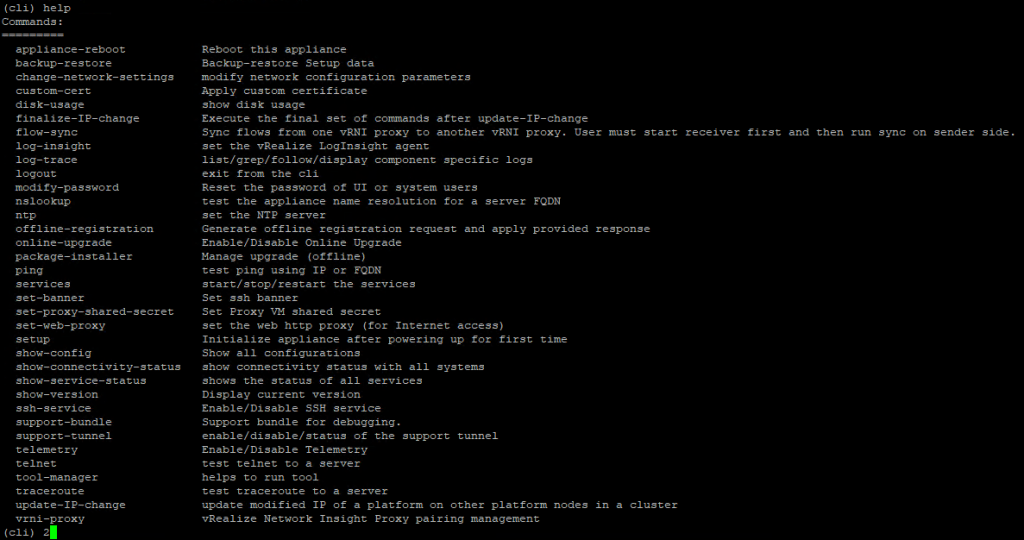
I wasn’t used to working with vRNI, so certainly not for troubleshooting it. For vRNI you have 2 userids that you can use to connect with putty.
On one hand you have the “consoleuser” and on the other hand you have the “support” userid. With the consoleuser you have access to a small cli to execute some basic troubleshooting tasks. Where you can see the commands below.
With the “support” userid you have access to the shell where you can access the logs. One thing I’ve found really annoying, is that for most commands you will need to use the sudo command to be able to access certain log files. The disadvantage of that is that you really need to know the correct locations of the files you want to check.
So for example if you want to check the upgrade log you need to executesudo less /var/log/arkin/centralized_upgrade.log
4. vIDM tips
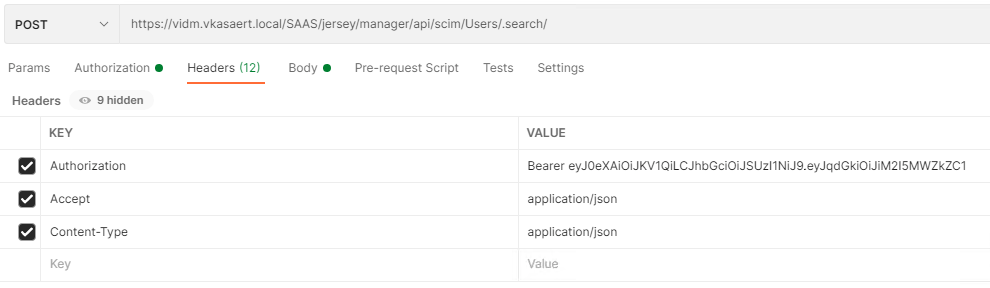
During the upgrade of vIDM, I got the error “Unable to login to the vIDM <vidm-hostname> using the provided defaultConfigurationUsername admin@local and defaultConfigurationPassword”. There’s a KB that solves that issue KB83586, but I’m providing some printscreens here because my API knowledge isn’t that great yet. In that way I can look back to my own blog articles in case I forget.

5. vRLI tips
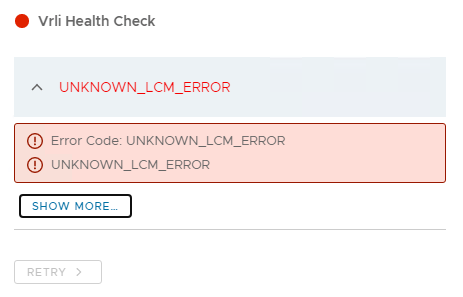
My upgrade from 8.4.1 to 8.6 failed in stage4 (vrlihealthcheck) with an unknown error.
When I checked the console of the VM, I could see the new version showing on the blue screen. Even when I logged on the website I could see that the new version was installed. So I tried a “Product Inventory Sync” which failed due to the fact that he couldn’t login with the root account. But I just had reset the password and tried a putty session to be sure all was good. So there had to be something more going on. So I restarted the process again to reset my root account.
I assume you know the drill open a webconsole to your VM, reboot the VM and when you see Photon OS bootscreen you press “e”. In the screen below you add “init=/bin/bash” and then you press “F10” to boot further.

But now I wanted to check the status of the root account with pam_tally2 -u root
There I could see that the account was locked by 60 attempts, so something went wrong.
You can unlock the account with pam_tally2 -u root -r
and then just to be sure I’ve check the status again with pam_tally2 -u root
and then you can see that it’s back at zero.

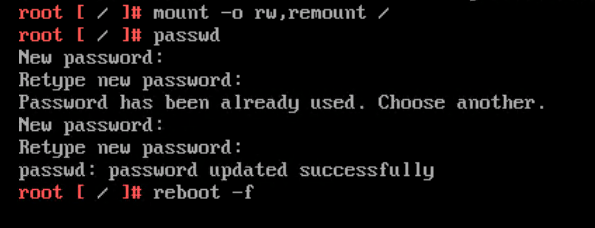
Now in the case that you would get a failure that the system is read-only then you need to run this command first mount -o rw,remount /
and then you can execute the passwd & tam_pally2 commands.
So BEFORE you go ahead and reset your account, first check if it’s not locked.
6. NSX tips
In ESX you can’t just change your password of admin & audit in a putty session with passwd. You will see that after a short amount of time your account is locked again. You can check the status of your account with “pam_tally2” as you can see in below printscreen.

You have 2 ways of resetting your password. You can do it in the GUI and you can do it with API calls.
Let me first start with the GUI. You go to “System” and then go to “Settings” and “Users and roles”. Here you can see that the status is “active” but before I started it was in a red status.
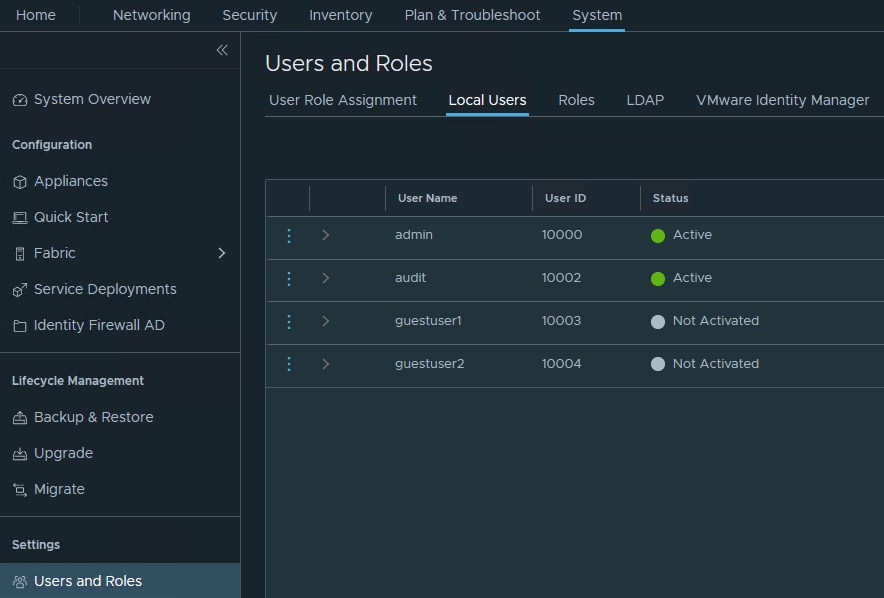
Just click on the 3 dots in front of the account and you can reset your password.

Now I’ve mentioned before that API’s aren’t my strong side. So I’m going to document the steps here. At first I was unable to use the API calls, because my account was also expired. When I executed this API it returned an error related to the admin account.
The only thing that you need to fill next to the GET command is the link to your NSX-manager followed by “/api/v1/node/users”. In the tab “Authorization” you fill in the credentials of your admin account. Then at the bottom you’ll see that it lists the different accounts.

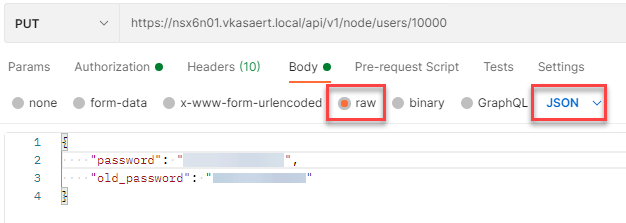
Now if you want to change the password you change your command to a PUT command. You change your API call to “/api/v1/node/users/10000”. 10000 is the ID of the admin account. You leave your “authorization” tab to what it was and in the “body”
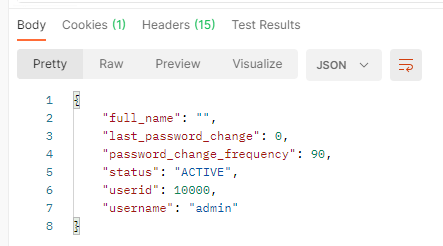
You will see this once your API request succeeded
7. Closing off
I hope that the issues I encountered during my upgrade can help you in having less issues during yours.
Any thoughts or ideas can always be shared off course.
