In part 2 I’ll continue the configuration of Aria through API’s. And as promised I’ll also dig a bit deeper into some more advanced options with Postman.
In case you forgot, the 3 places where you can find more information about API calls:
- Connect to your local deployment “https://vra_fqdn/automation-ui/api-docs/” where you will find information about API calls organized by use cases.
- Or you can check the online API documentation (currently version 8.6) => here
- And off course google is your friend.
Content blog article
- Create a Network Profile
- Update fabric network
- Create an IP range
- Create a Storage Profile
- Filter on API requests
- Launching multiple API requests
1. Create a Network Profile
We create a network profile by executing a POST to “iaas/api/network-profiles”. But before we can create a network profile we need to gather some info.
=> regionId = id of the cloud account you want to add to your network profile. Do a GET command to “iaas/api/cloud-accounts-vsphere” and choose the correct id of the cloud account where you want to create a network profile.
=> fabricNetworkIds = id of the fabric network you want to link your network profile to. In my case this relates to my vSphere PortGroups. Do a GET command to “iaas/api/fabric-networks-vsphere” to get the id you want to add. In my case I needed to add 2 fabric networks because I had 2 datacenters.
{
"description": "Your_Description",
"fabricNetworkIds": [
"fabric_network_id_you_want_to_add",
"fabric_network_id_you_want_to_add"
],
"regionId": "Cloud_account_id",
"name": "Your_network_profile_name",
"isolationType": "NONE"
}

2. Update fabric network
Now we will update our fabric network with DNS servers, default gateway, …. Here we need the same id that we used in point 1.
=> fabricNetworkIds = id of the fabric network you want to update. In my case this relates to my vSphere PortGroups. Do a GET command to “iaas/api/fabric-networks-vsphere” to get the id you want to update.
Now that we have that information we can sent a PATCH to “iaas/api/fabric-networks-vsphere/038cb75c-xxxx-xxxx-xxxx-xxxxxxxxxxxx” where 038cb75cxxxx is the id of the fabric network you want to update.
{
"domain": "your_AD_domain",
"dnsServerAddresses": [
"10.x.x.x",
"10.x.x.x"
],
"cidr": "10.x.x.x/24",
"defaultGateway": "10.x.x.1",
"tags": [
{
"key": "ntw",
"value": "your_value"
}
],
"dnsSearchDomains": ["your_AD_domain"]
}

3. Create an IP range
Before you can create an IP range and assign it to a network, make sure that you executed point 2, because your fabric network needs a configured CIDR. We need again the same id’s that we used in point 1.
=> fabricNetworkIds = id of the fabric network you want to add to your IP range. In my case this relates to my vSphere PortGroups. Do a GET command to “iaas/api/fabric-networks-vsphere” to get the ids you want to add.
To create an IP range sent a POST to “iaas/api/network-ip-ranges”
{
"fabricNetworkIds": [
"038cb75c-xxxx-xxxx-xxxx-xxxxxxxxxxxx",
"b523eed4-xxxx-xxxx-xxxx-xxxxxxxxxxxx"
],
"ipVersion": "IPv4",
"name": "VLAN_xxxx",
"startIPAddress": "10.x.x.x",
"endIPAddress": "10.x.x.x"
}

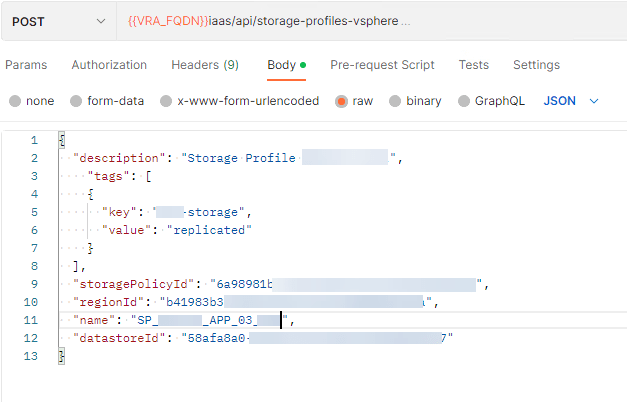
4. Create a Storage Profile
Before you can create a storage profile there are some things you need to lookup first. We need a regionId, datastoreId and if needed also a storagePolicyId
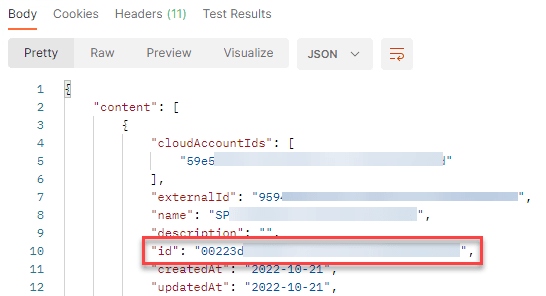
- regionId: the ID of the cloud account where you want to create your storage profile. Sent a GET command to /iaas/api/cloud-accounts-vsphere and the red square contains your regionId

- datastoreId: the ID of the datastore or datastore cluster you want to assign to this profile. /iaas/api/fabric-vsphere-datastores In my case I had replicated storage on both sides so I used filtering to make sure that I was getting the rigth ID. Send a GET to /iaas/api/fabric-vsphere-datastores?$filter=name eq ‘DSC_xxx_xx-xxx_03_SVS’ and cloudAccountId eq ‘055b7cf7-xxxx-xxxx-xxxx-xxxxxxxxxx’

- storagePolicyId: in case you’re using storage policies you also need to get the ID of the storage policy you want to attach. Sent a GET to /iaas/api/fabric-vsphere-storage-policies
Once you gathered the necessary information we’re executing a POST command to /iaas/api/storage-profiles-vsphere
{
"description": "your_description",
"tags": [
{
"key": "storage",
"value": "replicated"
}
],
"storagePolicyId": "the_id_you_found_for_your_storage_policy",
"regionId": "the_id_you_found_for_your_region",
"name": "your_name",
"datastoreId": "the_id_you_found_for_your_datastore_or_datastore_cluster"
}
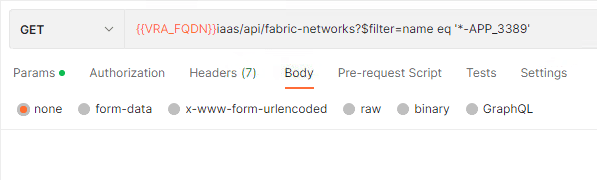
5. Filter on API requests
When you need to search data, it’s much easier when you don’t need to go through all the lines of codes that you get back from Aria Automation. Refining your search with filters will minimize the amount of code you receive back.
You simply add ” ?$filter=name eq ‘*-APP_3389’ ” behind your request => /iaas/api/fabric-networks?$filter=name eq ‘*-APP_3389’ This will only show you the fabric networks that ends on “-AP_3389”
In case you need to use multiple filters then you can use the AND operator to narrow your search even deeper. iaas/api/fabric-vsphere-datastores?$filter=name eq ‘DSC_BFS*APP’ and organizationId eq ’60f14fe7-xxxx-xxxx-xxxx-xxxxxxxxxxxx’ This will give you the datastores that match your filter and where the orgnizationId equals the ID you gave.

6. Launching multiple API requests
When you want to create multiple storage profiles, you don’t want to do a POST or PATCH for every request. Now is the time to automate your API calls or at least make the necessary adjustments for mass configurations.
First of all you create a text file as you can see below. Here you will see that I want to create 2 storage profiles.
[
{
"storageDescription": "Storage Profile xxxx",
"tagKey": "xxx-storage",
"tagValue": "non-replicated",
"storageRegionId": "2f95e154-xxxx-xxxx-xxxx-xxxxxxxxxx",
"storageName": "SP_BEI_WI_APP_01_FSN",
"storageDatastoreId": "beea9d7f-xxxx-xxxx-xxxx-xxxxxxxxxx"
},
{
"storageDescription": "Storage Profile xxxx",
"tagKey": "xxx-storage",
"tagValue": "non-replicated",
"storageRegionId": "2f95e154-xxxx-xxxx-xxxx-xxxxxxxxxx",
"storageName": "SP_BEI_WI_APP_02_FSN",
"storageDatastoreId": "bf7d5a31-xxxx-xxxx-xxxx-xxxxxxxxxx"
}
]

I found it easier to create a new Collection, where you move your POST request you want to execute. In the printscreen you can see that I created a New Collection “Test” and I added a New Request “Create Storage Profile”

Now in your body you put in the keys that you need to create your storage profile and then you get the variables out of your text file by putting them between {{xxx}}
{
"description": "{{storageDescription}}",
"tags": [
{
"key": "{{tagKey}}",
"value": "{{tagValue}}"
}
],
"regionId": "{{storageRegionId}}",
"name": "{{storageName}}",
"datastoreId": "{{storageDatastoreId}}"
}

Now go back to your collection, there you will see on the top right a button “Run”. Click it.

Click on “Select File” and browse to the file that you created in the beginning. If your file is correct, you will see the amount of blocks will match the number in the “Iterations” box.
Click on “Run Test” and your POST will be executed.

If you want to check if you’re requests ran fin then you can check the “History” tab. You have a nice overview of all the requests that were sent and the status of each request.

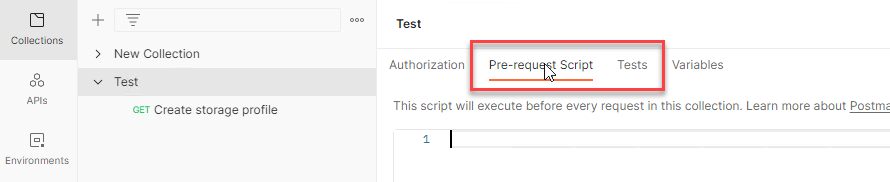
Now something else that can be useful is the possibility to run test while executing multiple API’s. When you go back to your collection you will see a tab “pre-request script” & “Tests”. That’s the location where you can define tests to be executed before or after each API request. I didn’t check the possibilities there yet, but a good idea to have a look and make sure that the API’s you’re executing don’t mess up you’re environment 😉
Closing notes
Hope this post was useful when you’re starting out with API’s. See you later and I wish everyone a HAPPY NEW YEAR 🙂
And as always feel free to comment….
