Hey VMware enthusiasts, this post will show you how you can deploy vRA 7.4 with LCM 2.0
Yes I know, I hear you thinking, why are you still using old versions while vRA 7.6 & LCM 2.1 is already out. Well due to a dependency on SRM I could only deploy vRA 7.4 and I wanted to document my journey as this is my first vRA deployment after the official course 🙂
I’m not going to document the deployment of the LCM appliance itself, as that’s straight forward. The configuration here is the setup within the LCM appliance and then the deployment of vRA.
Overview
This is the overview of the deployment I will be discussing in this article.
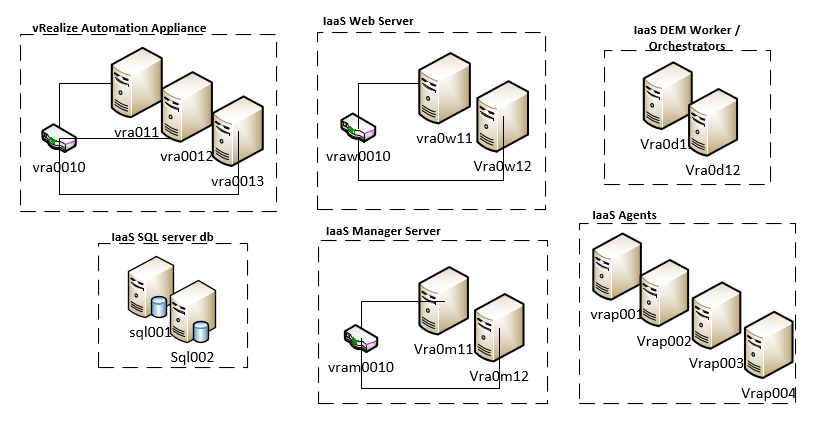
| VRA0010 | vRealize Automation Appliance (VIP) |
| VRA0011 | vRealize Automation Appliance (Node 1) |
| VRA0012 | vRealize Automation Appliance (Node 2) |
| VRA0013 | vRealize Automation Appliance (Node 3) |
| VRAW0010 | vRealize Automation IaaS Web (VIP) |
| VRAW0011 | vRealize Automation IaaS Web + Model Manager 1 |
| VRAW0012 | vRealize Automation IaaS Web 2 |
| VRAM0010 | vRealize Automation IaaS Manager (VIP) |
| VRAM0011 | vRealize Automation IaaS Manager + DEM Orchestrator 1 |
| VRAM0012 | vRealize Automation IaaS Manager + DEM Orchestrator 2 |
| CSQL0001 | MSSQL Database Server cluster name |
| RSQL0001 | MSSQL Database Server resource (client access point) |
| SQL0001 | vRealize Automation IaaS MSSQL Database (Node 1) |
| SQL0002 | vRealize Automation IaaS MSSQL Database (Node 2) |
| VRAD001 | vRealize Automation IaaS DEM Worker (Node1) |
| VRAD002 | vRealize Automation IaaS DEM Worker (Node2) |
| VRAP001 | vRealize Automation IaaS Proxy Agent (Node 1) |
| VRAP002 | vRealize Automation IaaS Proxy Agent (Node 2) |
| VRAP003 | vRealize Automation IaaS Proxy Agent (Node 3) |
| VRAP004 | vRealize Automation IaaS Proxy Agent (Node 4) |
1.Prereqs
Loadbalancers:
Before you start your deployment you need to make sure that you have connectivity to your VIP’s your going to use.
In my case the loadbalancers where not yet in production so I created a temporary C-Name entry in DNS that pointed to the first node.
Service account(s):
You can choose to combine these in 1 account.
1. Service account with administrative access on your vCenter
2. Service account with administrative privileges on your vRA windows server.
You will need to logon with this service account on all your windows machines before you start your deployment. If you don’t combine the accounts in 1 then you just need to logon with the service account for Windows.
On all your Windows servers (SQL server, IaaS Web / Manager / DEM / Proxy):
1. Install .NET 3.5 & .NET 4.5.2 or later
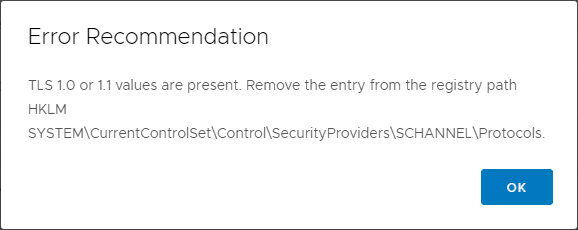
2. Remove TLS 1.0 & 1.1 in the registry HKLM\System\CurrentControlSet\Control\Security\Providers\SCHANNEL\Protocols
On the IaaS Web servers:
1. Install & Configure 64-bit Java JRE 1.8 Update 161 or later
2. Create a system variable JAVA_HOME and reboot. After reboot you should be able to execute => %JAVA_HOME%\bin\java.exe in a command prompt.

Configure IIS correctly:
Server roles:

Features

Now we’re ready to start the real work.
2. Upload binaries
First we will enable SSH so we can upload the binaries for vRA. Go to settings => system settings, go to the bottom and enable SSH.

Now we can upload the ISO’s to the LCM appliance. Establish an SSH connection to LCM and create the directory “/data/binaries/OVA” (or another one). Upload your ISO’s to the directory you just created.
Login to the website of your LCM and go to Settings => Product Binaries and then click on “Add Binaries”.
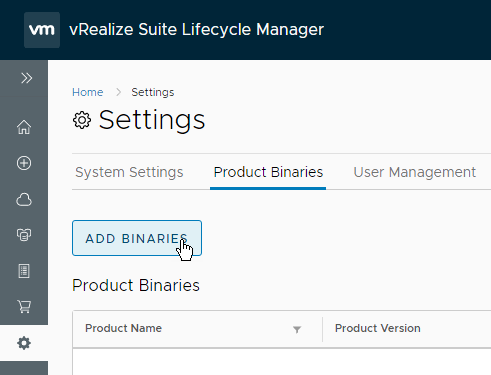
In your base location, fill in the directory you created above and click on “Discover”.
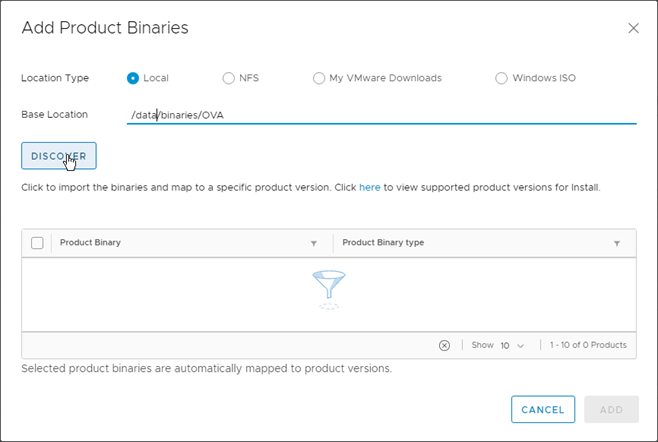
You will now see the ISO’s you uploaded previously.

3. Add datacenter
Go to Data Centers and click on “Add Data Center”

Give your Data Center a name and optionally give it a location, click on “Add”.

4. Add vCenters
Go to Data Centers and go to the tab “Manage vCenter Servers”. Click on “Add vCenter Server”. You will need to add all the vCenters where your vRA environment will be deployed to.
In my example I had 2 datacenters with different vCenters and I had 2 proxies on a vCenter in another datacenter. To be able to deploy your vRA in such a setup you will need to add that foreign vCenter in the same DataCenter where most of your vRA appliances will be located. Hope this makes sense 🙂

Fill in the vCenter FQDN name and the service account (Domain\username) that you will use for your vRA deployment

Depending on your setup it’s possible that you will have multiple vCenters in your config. You can have a mix of Management / Workload or Consolidated Management and Workload vCenters.

5. Create self-signed certificate
For the initial deployment we will use a self-signed certificate which we will replace once the environment is deployed. Go to settings and go to the tab Certificate. Click on “Add Certificate”.
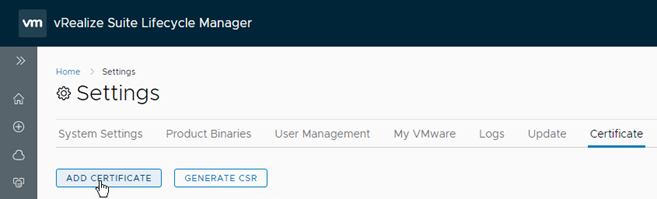
Select “Generate Certificate” and provide the needed info.
Domain name: I added all the short names and FQDN’s of the appliances, windows servers & VIP names
IP Address: I added all the IP’s of the appliances, windows servers & VIP’s

6. Create vRA environment
On the home page, click on the big green button to create a new environment.

Fill in the required fields for your environment and then click on the “Next Button”. The default password you fill in, will be the password for all the accounts on your vRA deployment.

I’m deploying a large vRA 7.4 with HA. Click on Next to continue.

6.1 EULA
Accept the EULA and click on Next

6.2 Licensing
Fill in the License key you received.

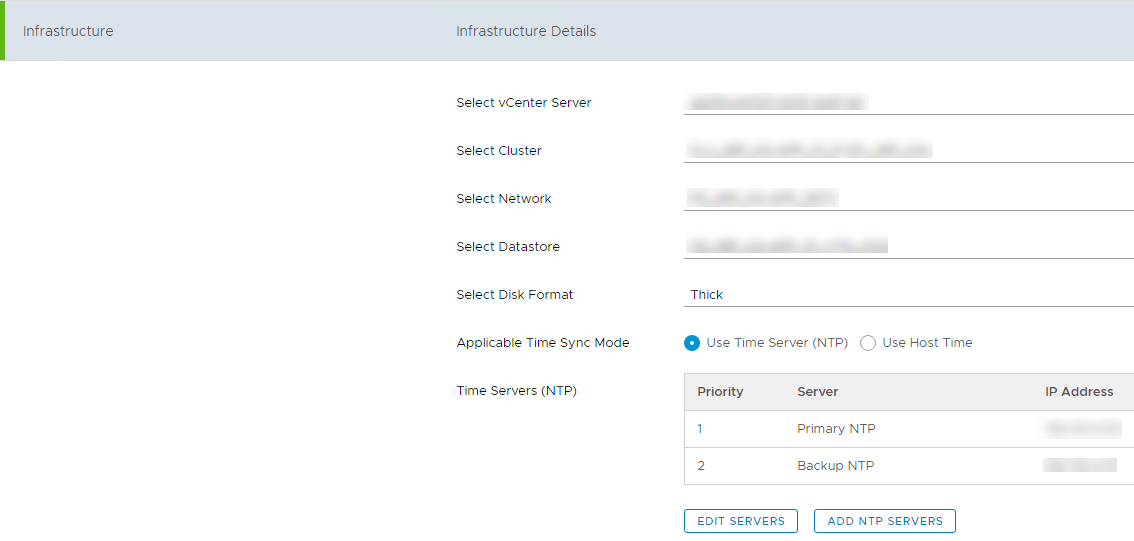
6.3 Infrastructure details
Give the details of the infrastructure where you want to deploy your environment. Also add your NTP servers to the list.
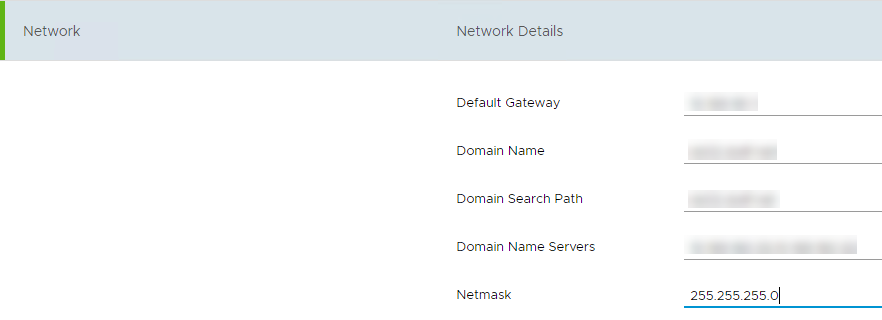
6.4 Network details
Provide your network details.
6.5 Certificate details
Choose the self-signed certificate you created in one of the previous steps

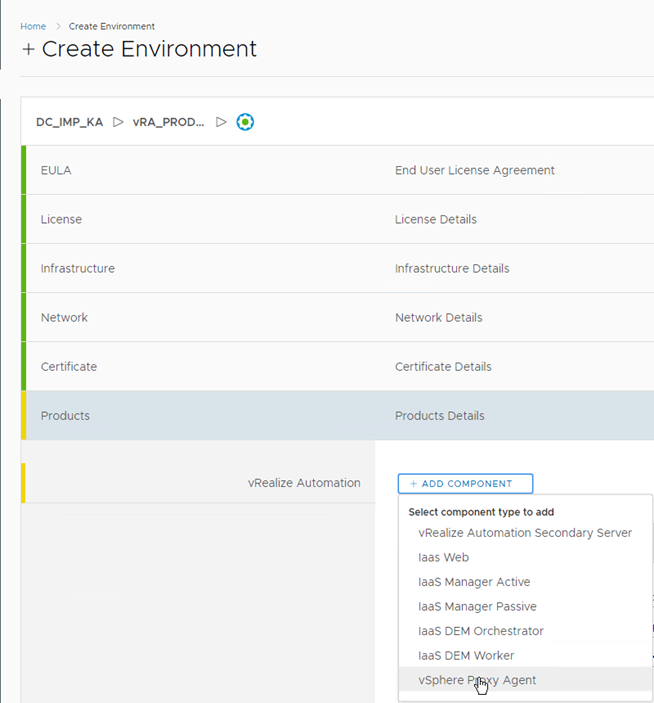
6.6 Product Details
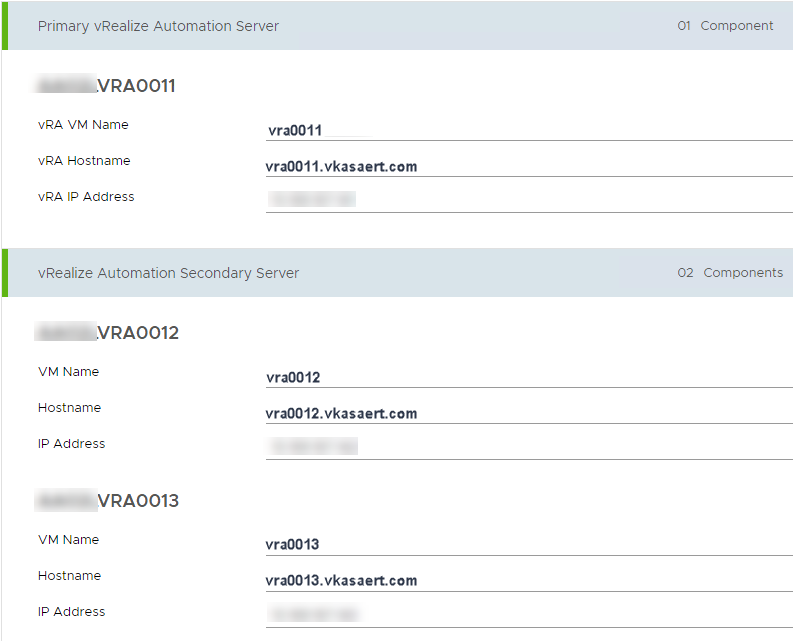
In my environment I had 1 extra vRealize Automation Secondary Server so I added that with “Add Component”

And also 2 extra vSphere Proxy Agents which I added in the same way.
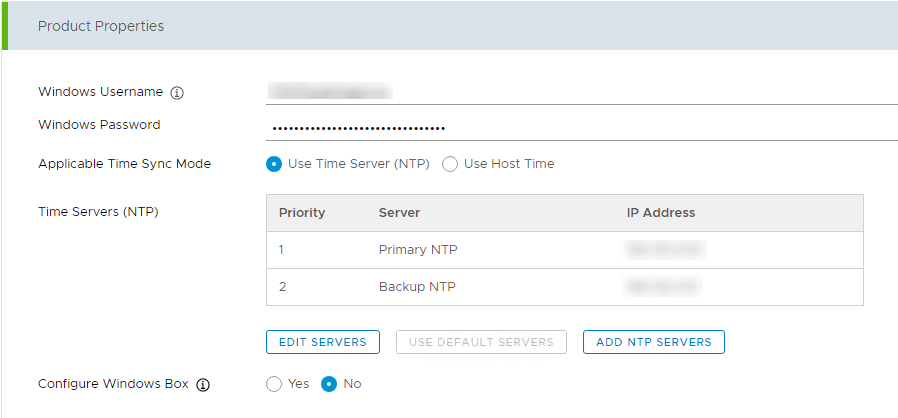
Provide the Windows service account you will use for your deployment (Domain\username). In my case the windows boxes were already provisioned so I selected the option “Configure Windows Box” as “No”
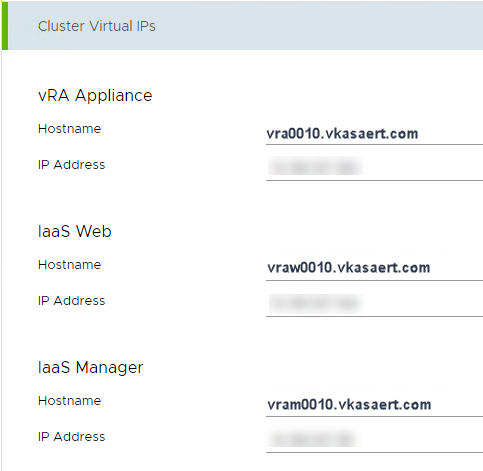
6.7 Cluster IP’s
Provide the FQDN and the IP of your VIP’s your going to use for all 3 clusters.
6.8 vRealize Automation servers
Fill in the information for your vRealize Automation Servers.
6.9 Database
I must admit that giving the Database information confused me, because my database was present on a Microsoft Cluster.
Finally I provided this information:
Database hostname: the FQDN of the resource in your microsoft cluster where the SQL database was present
Database IP address: the IP of the resource in your microsoft cluster where the SQL database was present
Windows VM Name: here I provided the name of the server where the SQL service was running on. The servername that’s visible in your vCenter.

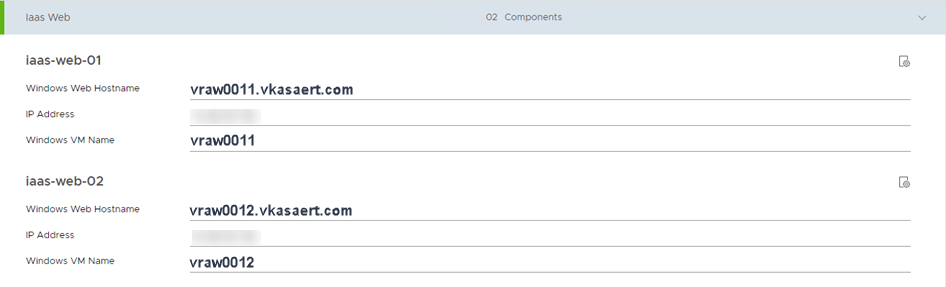
6.10 IaaS Web
Fill in the information for your IaaS Web Servers.
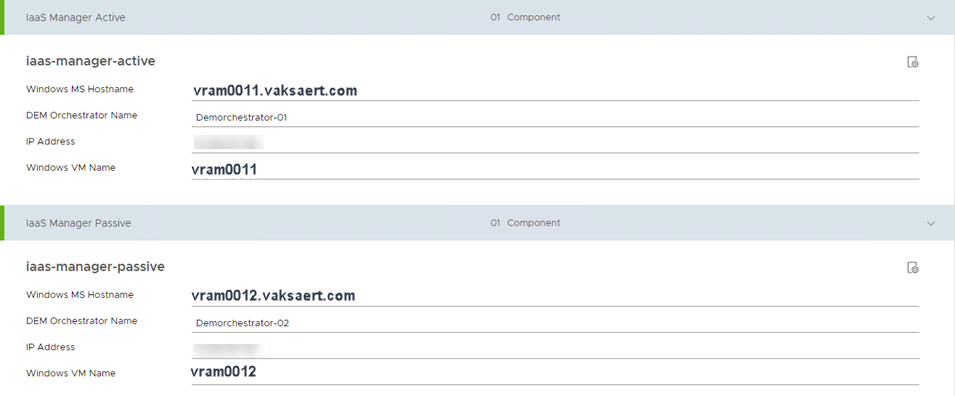
6.11 IaaS Manager
Fill in the information for your IaaS Manager Servers.
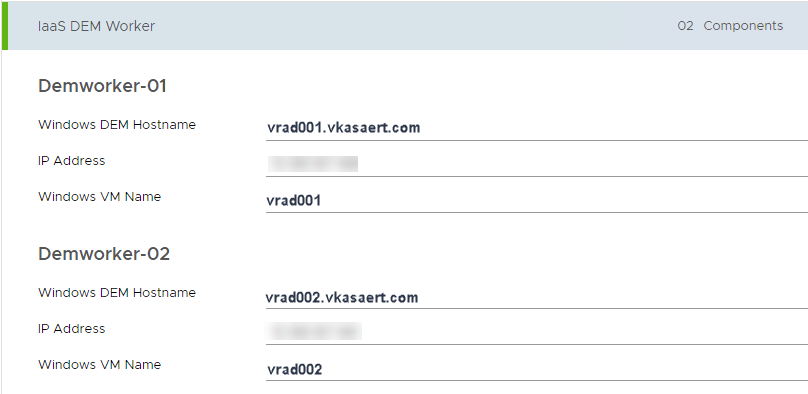
6.12 IaaS DEM Workers
Fill in the information for your IaaS DEM Servers.
6.13 vSphere proxy Agents
Fill in the information for your IaaS Proxy Servers.

For your vSphere Proxy Agents there is still some advanced config to do. Click on the advanced setting of your proxy server. You can find that button on the right of your screen.

In Product => Agent Name: fill in the name of the vCenter that you want to connect to. This will need to match the config of the endpoint you’re going to create in vRA. This will become clear in my next post.

6.14 Pre-Check
After you filled in all the required fields you can start your pre-check.

Click on “Run Precheck”.

Click on Next once your pre-check is succesful.

Just click on the “Submit” button.

Sit back, relax and hopefully you don’t get any errors during your deployment 🙂
In my next post I’ll talk about health-checking your deployment of vRealize. Below you can find the issues I encountered during my deployment and the steps I took to resolve them.
7. Encountered issues
If you respect my prereqs then you shouldn’t have any issues during your deployment. But for the completeness of the article I added them.
7.1 Pre-check fails with “Uploading the LCM agent binaries failed”
If you receive below error, you need to login with the service account on your windows servers.

7.2 Pre-check fails with “Failed to find precheck agent binaries”
When I experienced this error I saw temp profiles on the server. So I cleaned them out. I checked if there were no .bak entries in the registry on HKLM\SOFTWARE\Microsoft\Windows NT\CurrentVersion\ProfileList and then rebooted the server.

7.3 Pre-check fails “TLS check”
The error Recommendation explains it all.

7.4 Install IaaS agent failed
I received below error when my deployment came to the last step of installing the IaaS agent. This was because I didn’t think I needed to install .NET 3.5 on my proxy servers.
com.vmware.vrealize.lcm.common.exception.EngineException: Failure: Command execution result:
Command id: 4181d1c3-5eec-4023-a270-4257e82ea2d6
Type: run-prereq
Node id: 92236656-F95D-4E63-80E8-79E68F6ABC01
Node host: XW02LVPAK001.ds02.ds4f.net
Result: Successfully applied fix for RebootPending prerequisite (Check if reboot is pending).
The request to add or remove features on the specified server failed.
Installation of one or more roles, role services, or features failed.
The source files could not be found.
Use the “Source” option to specify the location of the files that are required to restore the feature. For more information on specifying a source location, see http://go.microsoft.com/fwlink/?LinkId=243077. Error: 0x800f081f
Applying automatic fix for ASPNET prerequisite failed.
Applying automatic fix for NetEnvironment prerequisite failed.
Applying automatic fix for NonHttpActivation prerequisite failed.
Result description: System.Exception: The request to add or remove features on the specified server failed.
Installation of one or more roles, role services, or features failed.
The source files could not be found.
Use the “Source” option to specify the location of the files that are required to restore the feature. For more information on specifying a source location, see http://go.microsoft.com/fwlink/?LinkId=243077. Error: 0x800f081f
System.Exception: The request to add or remove features on the specified server failed.
Installation of one or more roles, role services, or features failed.
The source files could not be found.
Use the “Source” option to specify the location of the files that are required to restore the feature. For more information on specifying a source location, see http://go.microsoft.com/fwlink/?LinkId=243077. Error: 0x800f081f
Applying automatic fix for ASPNET prerequisite (IIS Server ASPNET Module) failed. Error: Unable to apply fix: [The request to add or remove features on the specified server failed.
Installation of one or more roles, role services, or features failed.
The source files could not be found.
Use the “Source” option to specify the location of the files that are required to restore the feature. For more information on specifying a source location, see http://go.microsoft.com/fwlink/?LinkId=243077. Error: 0x800f081f
]
Applying automatic fix for NetEnvironment prerequisite (Windows Process Activation Service/Application Services NetEnvironment Role) failed. Error: Unable to apply fix: [The request to add or remove features on the specified server failed.
Installation of one or more roles, role services, or features failed.
The source files could not be found.
Use the “Source” option to specify the location of the files that are required to restore the feature. For more information on specifying a source location, see http://go.microsoft.com/fwlink/?LinkId=243077. Error: 0x800f081f
]
Applying automatic fix for NonHttpActivation prerequisite (Windows Process Activation Service/Application Services NonHttpActivation Role) failed. Error: Unable to apply fix: [The request to add or remove features on the specified server failed.
Installation of one or more roles, role services, or features failed.
The source files could not be found.
Use the “Source” option to specify the location of the files that are required to restore the feature. For more information on specifying a source location, see http://go.microsoft.com/fwlink/?LinkId=243077. Error: 0x800f081f
]
Error: {“5”:[{“resultMsg”:”The request to add or remove features on the specified server failed.\r\nInstallation of one or more roles, role services, or features failed.\nThe source files could not be found. \r\nUse the \”Source\” option to specify the location of the files that are required to restore the feature. For more information on specifying a source location, see http://go.microsoft.com/fwlink/?LinkId=243077. Error: 0x800f081f\n”,”resultDescr”:”System.Exception: The request to add or remove features on the specified server failed.\r\nInstallation of one or more roles, role services, or features failed.\nThe source files could not be found. \r\nUse the \”Source\” option to specify the location of the files that are required to restore the feature. For more information on specifying a source location, see http://go.microsoft.com/fwlink/?LinkId=243077. Error: 0x800f081f\n”},{“resultMsg”:”The request to add or remove features on the specified server failed.\r\nInstallation of one or more roles, role services, or features failed.\nThe source files could not be found. \r\nUse the \”Source\” option to specify the location of the files that are required to restore the feature. For more information on specifying a source location, see http://go.microsoft.com/fwlink/?LinkId=243077. Error: 0x800f081f\n”,”resultDescr”:”System.Exception: The request to add or remove features on the specified server failed.\r\nInstallation of one or more roles, role services, or features failed.\nThe source files could not be found. \r\nUse the \”Source\” option to specify the location of the files that are required to restore the feature. For more information on specifying a source location, see http://go.microsoft.com/fwlink/?LinkId=243077. Error: 0x800f081f\n”},{“resultMsg”:”The request to add or remove features on the specified server failed.\r\nInstallation of one or more roles, role services, or features failed.\nThe source files could not be found. \r\nUse the \”Source\” option to specify the location of the files that are required to restore the feature. For more information on specifying a source location, see http://go.microsoft.com/fwlink/?LinkId=243077. Error: 0x800f081f\n”,”resultDescr”:”System.Exception: The request to add or remove features on the specified server failed.\r\nInstallation of one or more roles, role services, or features failed.\nThe source files could not be found. \r\nUse the \”Source\” option to specify the location of the files that are required to restore the feature. For more information on specifying a source location, see http://go.microsoft.com/fwlink/?LinkId=243077. Error: 0x800f081f\n”}],”15028″:[{“resultMsg”:”Applying automatic fix for ASPNET prerequisite failed.”,”resultDescr”:”Applying automatic fix for ASPNET prerequisite (IIS Server ASPNET Module) failed. Error: Unable to apply fix: [The request to add or remove features on the specified server failed.\r\nInstallation of one or more roles, role services, or features failed.\nThe source files could not be found. \r\nUse the \”Source\” option to specify the location of the files that are required to restore the feature. For more information on specifying a source location, see http://go.microsoft.com/fwlink/?LinkId=243077. Error: 0x800f081f\n]”}],”15035″:[{“resultMsg”:”Applying automatic fix for NetEnvironment prerequisite failed.”,”resultDescr”:”Applying automatic fix for NetEnvironment prerequisite (Windows Process Activation Service/Application Services NetEnvironment Role) failed. Error: Unable to apply fix: [The request to add or remove features on the specified server failed.\r\nInstallation of one or more roles, role services, or features failed.\nThe source files could not be found. \r\nUse the \”Source\” option to specify the location of the files that are required to restore the feature. For more information on specifying a source location, see http://go.microsoft.com/fwlink/?LinkId=243077. Error: 0x800f081f\n]”}],”15039″:[{“resultMsg”:”Applying automatic fix for NonHttpActivation prerequisite failed.”,”resultDescr”:”Applying automatic fix for NonHttpActivation prerequisite (Windows Process Activation Service/Application Services NonHttpActivation Role) failed. Error: Unable to apply fix: [The request to add or remove features on the specified server failed.\r\nInstallation of one or more roles, role services, or features failed.\nThe source files could not be found. \r\nUse the \”Source\” option to specify the location of the files that are required to restore the feature. For more information on specifying a source location, see http://go.microsoft.com/fwlink/?LinkId=243077. Error: 0x800f081f\n]”}]}
Status: FAILED at com.vmware.vrealize.lcm.plugin.core.vra70.task.iaas.RunIaasPreCheck.execute(RunIaasPreCheck.java:105)
at com.vmware.vrealize.lcm.platform.automata.service.Task.retry(Task.java:80)
at com.vmware.vrealize.lcm.platform.automata.core.ExecutionTask.run(ExecutionTask.java:39)
at java.util.concurrent.ThreadPoolExecutor.runWorker(ThreadPoolExecutor.java:1149)
at java.util.concurrent.ThreadPoolExecutor$Worker.run(ThreadPoolExecutor.java:624)
at java.lang.Thread.run(Thread.java:748)

2 thoughts on “Deploy vRealize Automation with Lifecycle Manager (part 1)”
Comments are closed.